(10am - 7pm PST)

![]()
In a nutshell, here’s what I tell my clients:
Your “stuff” needs a home. We start organizing by creating a thoughtfully planned, dedicated place for those things to “live.”
How I help them overcome resistance:
Focus on one small area at a time. Then break it down into simple, do-able steps.
![]()
With any organizing challenge I use the following Seven Simple Steps:
Step 1. Assess. Take a critical look at your situation, paying attention to your needs and wants. Where are you now and where do you want to be? What would it look like when it was done? How would it function? Do you have the Will, Interest, Time and Support (WITS) to make a positive change in your life? Answering these questions will help you prioritize your organizing action plan.
Helpful hint: Focus on one small area at a time. If you try to do too much at once you can easily get overwhelmed. Once you have chosen a specific, small and manageable area to begin, you can go on to Step 2.Step 2. Get what you need to do the deed. You will need supplies such as containers (bins, folders, drawers, plastic tubs, etc.) and labeling materials. You’ll want a clear work space to sort and temporarily store items from the area you’re organizing and, most importantly, a Buddy (friend, relative or Professional Organizer) to help you through the rough spots. Now believe me, there will be rough spots. If there weren’t any, you wouldn’t be here in the first place. Now, one more thing - it’s all about storage. You need a place, a permanent home, to put the things you’re organizing. (See Step 1.)
Step 3. Categorize (keep it simple), sort (like with like), purge (let go) and move on. If you’re having trouble with this one (“Should they Stay or Should they Go?”), go back to Step 1 and reassess. If that isn’t enough go back to Step 2 and ask your Buddy (friend, relative or Professional Organizer) for help.Step 4. Clean it up! Here is your chance to chase those dust bunnies away. This may be the opportunity of a lifetime (first time ever, perhaps?) to get in there and bust that dust! Oh by the way, once you’ve organized that space, it will be MUCH easier to keep clean.
Favorite CD’s for sorting and clean-up:
The Rolling Stones “Stripped” – Penny St. John
Squirrel Nut Zippers “Hot” – Kevin Kappock
The Strokes “Is this It?” – Mary Ramos
(TAFKA) Prince “Rave Un2 the Joy Fantastic” – Susan Sissan
What’s yours?
Step 5. Containerize, label and place in their new homes. This is the really fun part where you get to see it all coming together.
Step 6. Celebrate your success! This is even more fun!! No matter how large or small your organizing project may be, be sure to pat yourself on the back for a job well done. If you don’t want to celebrate alone, call me. I love to party.
Step 7. Maintain it. Now that you’re organized, it’s easy to keep it that way. Just a few minutes a day is all it will take to keep your organized area in perfect health. Do it as you go along or get out those day planners and PDAs. If you are like many who chafe at the thought of and resist any kind of daily scheduling, be creative. Set do-able tasks and sustainable limits for yourself and always feel free to revisit Step 6.

 |
Has that stack of filing got you down? Pop a Tic Tac in your mouth. In the time it takes to freshen your breath, you can really make a dent in that pile. |

![]()
Let’s apply the Seven Simple Steps to something specific. How about:
Junk Drawers 101
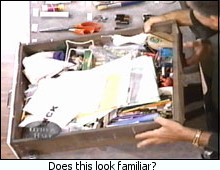 Yeah, we all have ‘em. We love ‘em and we hate ‘em. Those drawers, usually in the kitchen, that are filled to bursting with all kinds of stuff: batteries, packets of cut flower preservative, twist ties, tools, tape, little plastic pieces of unknown origin, pens, pencils, post-its, screws, nails, flashlights, paint chips, membership cards, coupons, matchbooks with phone numbers written on them…
In other words, it’s a black hole.
Of course, a junk drawer can be a very useful thing to have. We all need those “little things” to keep our households running.
Here’s how to organize your junk drawer into a high functioning, useful part of your home. We’ll follow the Seven Simple Steps.
Step 1. Assess. It’s a mess, right? More than one drawer? Let’s make our goal be to condense it down to one easy-to-reach drawer filled with the most useful items. At this point, you have the will and interest. As for time, plan or schedule this now. It will just take a moment to do. Be sure to schedule in time for Step Two, as well.
Step 2. Get what you need to do the deed. For this project our supply list is brief:
- Junk Drawer Organizer. These are inexpensive plastic compartmentalized trays similar to silverware dividers. They come in various sizes, so measure the inside of your drawer, now. For EASY online ordering, go to http://www.OrganizedAtoZ.com.
- Labeling Materials. If you have a label maker - great. If not, masking tape and a pen will do nicely. Don’t forget the scissors (if you can find them!).
- Sorting space. Clear an area, (counter top, table top) several times larger than the drawer, for sorting.
- Support. Hey, I’m right here. Let’s move on to Step 3. Or get a buddy. They can bring their own junk drawer!

Step 3. Turn on the music and roll up your sleeves. Here we go. Empty the junk drawer(s) piece by piece. Sort into categorized piles - like with like. Feel free to discard anything that is obviously not worth keeping (broken items, out of date items).
Step 4. Clean it up. Take a damp rag and wipe out the drawer. Bust that dust. Is it wood? Try a little Murphy’s Oil Soap for conditioning and a nice light aroma. Ink Stains? Try a little dab of cleansing powder or baking soda. Gum? Sticky - mystery substances? Contact the Queen of Clean (www.queenofclean.com). Has SHE got great cleaning tips!
Step 5. Assemble the Junk Drawer
A. Place your junk drawer organizer in the empty, clean drawer. Count the number of compartments.
B. Now, lets revisit Step 1 for a moment. Assess your piles of sorted items. How many are there? If the number of piles is less than or equal to the number of compartments, great. Go on to part D.
C. If you have more piles than compartments, remember, they don’t call it a junk drawer for nothing. Take a critical look. Go ahead and let go of some of those doubtful items - throw them out. Still too many piles? Ask yourself if there are other, logical places for some of those things. For example, packets of flower preservative could be put in a zip lock bag and placed with your vases. Unused film can go in the refrigerator, chopsticks in the silverware drawer, etc. As you eliminate piles, keep in mind what items you would find most useful in your new junk drawer.
D. Right size it. Now we’re down to piles of things that will live in the junk drawer. How do you know which compartment is best for which items? That’s easy. Size is our first clue. Larger items such as rulers and scissors need a larger compartment. Priority will also inform your choices. Try to put the most frequently needed items in front or on top. Are there too many items in the pile to fit in the compartment? Go back to part C, above. Maybe you don’t have to have quite so many twist ties! You can do it!
E. Label it. Now that everything is in its place, let’s make it official. Create labels for each compartment and place them so they can be easily seen. Why bother with labels? This critical step will help ensure the well-organized lifetime of your junk drawer. You and other household members will be much more motivated to keep things where they belong.
Step 6. Celebrate your success! Treat yourself as you gaze lovingly into your new, well-organized, easy-to-use and pleasure-on -the-eye junk drawer. Go ahead, open and close it several times. Call your best friend or e-mail them a picture. That sure was easier and faster than you thought it would be, wasn’t it? And best of all – it’s done now!!!
Step 7. Maintain it. It’s easier than you think. (See part E, labels, above.) Should new items that need a home present themselves, “containerize” and label them. Zip lock bags or small plastic tubs with lids work great.
Questions? Comments? 
![]()
So many of my clients ask me how long they should hang on to financial papers. Here’s what I’ve learned:
Papers: What to keep and what to throw away.
Do you have boxes and bags filled to the brim with old papers?  Is your filing cabinet so crammed with documents “older than the hills” that you can’t fit anything more in? Then it’s time to do a little Step 1 and a lot of Step 3. Experts say 80 percent of the paper in our files are used once and never again. Consider your financial records. The trick, of course, is knowing what to keep and what to toss out. Here’s a guide written by Soljane Martinez, published in the Wall Street Journal, February, 2001.
Tax Returns.Despite what many people think, the statute of limitations on federal tax audits is only three years. Even so, experts say tax returns are one of the few things you should keep indefinitely. “Tax returns contain your life story on a year-to-year basis,” says Douglas Stives, a certified public accountant and personal financial specialist in Red Bank, NJ. “There is no legal requirement to keep them, but it gives you a good track as to where you have been.” All supporting tax documents, such as W2 forms and receipts for deductions, can be thrown out after three years, however.

Investment records. Documents relating to buying a house or stocks and bonds should be kept for as long as you own them. Once you sell the asset, however, the same three-year rule applies, again for tax reasons. Proof of mortgage and rental payments also should be kept for three years.
Household bills. When it comes to items that aren’t tax - deductible , such as utility bills and credit cards statements, you can generally throw them out after a year. The same is true with bank statements, cancelled checks and medical bills (as long as you’re not using medical costs as a deduction). Although the statute of limitations on billing disputes is seven years in many states, it’s probably not worth keeping bills around that long. In many cases, you can get a copy of the disputed bill from the bank, credit card issuer or merchant if something comes up.
In Conclusion…
So, did you read the line that said “All supporting tax documents, such as W2 forms and receipts for deductions, can be thrown out after three years”? Ahem. Need I say more? OK, I will anyway. Go through that old stuff and purge, purge, purge. But do it safely. Shredders are inexpensive and are wrist savers.


![]()
http://www.irs.gov/newsroom/article/0,,id=105111,00.html
General info from the IRS.
http://www.bankrate.com/brm/itax/edit/news/stories/
news_071900a.asp
A wonderfully comprehensive and easy to read table.
![]()
![]() Check this out! Some of the most useful and attractive organizing products I've found. EASY online ordering from Bill's own personalized shopping cart at http://www.OrganizedAtoZ.com
Check this out! Some of the most useful and attractive organizing products I've found. EASY online ordering from Bill's own personalized shopping cart at http://www.OrganizedAtoZ.com

Home | All About The Organizing Guy | Services | Events/Appearances | Tips | Links/Products | Contact The Organizing Guy